What Makes a Wardrobe Product Image Successful on Home24?
A wardrobe on Home24 competes with hundreds of similar products — and customers decide in seconds which listing they click. Your product images are the only tool that makes the difference.
The problem: most sellers underestimate how much work goes into a compelling wardrobe listing. This article shows you the technical requirements, the right image types and perspectives, and a scalable workflow for your image production. Similar guides for Home24: dining table product images on Home24 and wardrobe images on Otto.
Why Product Images Determine Your Home24 Success
On Home24, customers can’t touch your wardrobe, open the doors, or feel the material. Your images take over this role completely. They replace the in-store shopping experience — and directly determine clicks, time on page, and purchases.
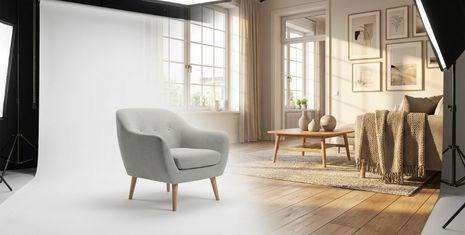
A cutout on a white background shows the product, but it provides no context. Customers want to know how the wardrobe looks in a real bedroom. Without this context, they scroll on to the next seller.
- Trust: High-quality images signal product quality before the customer even reads the description
- Returns: Clear representation of dimensions, interior layout, and material prevents wrong purchases
- Visibility: Better images lead to more clicks in direct listing comparisons
Why Wardrobes Are Hard to Photograph
Wardrobes are among the most challenging furniture pieces in product photography. If you know where the difficulties lie, you can specifically work around them and achieve better results.
Large Dimensions Quickly Exceed Standard Studio Capacity
A wardrobe two meters tall and over a meter wide doesn’t fit in every photo studio. You need sufficient distance to capture the entire piece of furniture without distortions. Many sellers underestimate the space requirements and end up with cropped or perspectively distorted shots.
Glossy or Reflective Surfaces Reflect Light and Surroundings
High-gloss fronts, mirrors, and lacquered surfaces are common in wardrobes — and a nightmare for photographers. You’ll quickly see light spots, camera equipment, or studio surroundings reflected in the finished image. Diffused lighting and correct positioning help minimize these reflections.
Interior Layout and Storage Space Are Hard to Capture in Two Dimensions
A wardrobe lives through its interior: compartments, drawers, clothing rails, and shelves. In a two-dimensional photo, this depth often looks flat and cluttered. You need to work with lighting and perspective to make the spatial depth of the interior visible.
Different Opening States Require Multiple Shots
Customers want to see the wardrobe closed, half-open, and fully open. Each state requires a separate shot with adjusted lighting because the light conditions change with every door position. This significantly multiplies the effort per product.
Technical Image Requirements from Home24 for Wardrobes
Home24 has clear specifications for product images. If you don’t meet these standards, your listing is either rejected or underperforms compared to the competition.
Resolution and File Formats
Upload your images in JPEG or PNG. The minimum resolution is 1000 x 1000 pixels, though higher resolutions are better. The reason: Home24 offers a zoom function that lets customers examine details like handles, surfaces, or hinges more closely. At low resolution, the image becomes blurry when zooming.
Background and Cutout Requirements
The main image requires a cutout — meaning the product on a white or transparent background, without distracting elements. A cutout is an image where the product has been “isolated” from the original background. This standard ensures comparability between products and a consistent look in the category overview.
Optimal Number of Images per Listing
A complete wardrobe listing ideally includes 5-8 images. More images give customers the opportunity to see the product from different perspectives. A single image isn’t enough to answer all the questions a customer has before buying.
Required Image Types for Your Wardrobe Listing
Each image type serves a different purpose in the purchase process. The following overview shows you which images you need and when to use them.
| Image Type | Purpose | When to Use |
|---|---|---|
| Cutout | Clear product view | Main image, required |
| Lifestyle image | Product in living context | For emotional appeal |
| Detail shot | Material and craftsmanship | For premium features |
| Dimension drawing | Size proportions | Recommended for all wardrobes |
Cutout on White Background
The cutout is your required image. It shows the product without distraction and enables direct comparison with other wardrobes. Ensure even lighting and a neutral perspective that accurately represents proportions.
Lifestyle and Ambiance Images
An ambiance image shows your wardrobe in a furnished room scene — such as a bedroom with a bed, rug, and decorations. Customers want to envision how the piece of furniture would look in their own home.
Here’s the issue, though: traditional lifestyle shoots cost between 250 and 500 euros per product when you factor in photographer, studio rental, and styling. With an assortment of 50 or 100 wardrobes, that’s barely feasible. AI tools like showcase solve this problem by generating photorealistic living scenes from a single cutout — in seconds instead of weeks.
Detail Shots and Close-Ups
Show handles, hinges, the interior layout, and the surface texture in separate images. A customer who sees the wood grain or the quality of the hardware buys with more confidence. Detail shots are especially important for higher-priced wardrobes, where quality is a central buying argument.
Dimension Drawings and Infographics
Dimension drawings visualize width, height, and depth at a glance. For wardrobes, this is particularly relevant: does the wardrobe fit in the alcove? Is the depth sufficient for hangers? A clear dimension drawing answers these questions immediately without the customer having to search through the product description.
Perspectives for Different Wardrobe Types
Not every wardrobe needs the same views. Depending on the construction type, certain perspectives are especially relevant.
Photographing Hinged-Door Wardrobes Optimally
Show hinged-door wardrobes with both closed and open doors. The interior layout — compartments, clothing rails, drawers — is an important buying argument that’s only visible when the doors are open. A front view with closed doors plus a view with open doors covers the most important information.
Showcasing Sliding-Door Wardrobes at Their Best
With sliding-door wardrobes, the sliding mechanism is a central feature. Photograph different opening positions to show how the doors glide and which area is accessible at each position. Customers want to understand how much space they can reach simultaneously.
Showing Corner Wardrobes from the Right Perspective
Corner wardrobes have a complex shape that’s hard to capture in photos. Choose perspectives that clearly show the actual space requirements and room utilization. A view showing both sides of the wardrobe helps customers envision integrating it into their room corner.
How to Convincingly Show Dimensions and Interior Features
Customers ask one central question: will my clothes fit inside? Your images answer this question visually before the customer even reads the product description.
- Open doors: Show the complete interior layout with all compartments and rails
- Dimensions in the image: Integrate height and width measurements directly into the shot
- Reference objects: Use clothing items or accessories as size references
An image with hanging shirts or stacked sweaters immediately conveys how much storage space the wardrobe offers. This is often more convincing than a numerical specification in the product description.
Presenting Color Variants and Material Options Without Multiple Shoots
Here’s a typical bottleneck: photographing each color variant individually costs time and money. For a wardrobe in five colors, that means five separate shoots — or five prototypes that first need to be produced.
AI-powered solutions like showcase solve this problem. You upload a single cutout and generate all color variants digitally — from natural oak to white high-gloss to anthracite. This also works for material changes, such as from wood-look to lacquer.
Start with your best-selling variant as the source image. This gives the AI the best foundation for realistic results with the other variants.
Checklist for Successful Wardrobe Product Images
Go through these points for every new listing before you publish it.
1. Check Technical Quality
Verify resolution (at least 1000 x 1000 pixels), format (JPEG or PNG), and file size. Blurry or pixelated images look unprofessional and hurt conversion.
2. Cover All Required Image Types
Do you have cutouts, lifestyle images, detail shots, and dimension drawings? A complete set answers all customer questions visually.
3. Include Relevant Perspectives
Depending on wardrobe type: views from the front, side, open and closed. Don’t forget the interior view for wardrobes.
4. Make Dimensions and Details Visible
Are interior layout and dimensions clearly recognizable? Customers want to know if their clothes will fit.
5. Ensure Brand Consistency
All product images from a brand should ideally look like they belong together. The brand identity feature in showcase analyzes your website and automatically generates brand-consistent scenes — saving you manual post-processing.
6. Include a Dimension Drawing with Height, Width, and Depth
Make sure at least one image shows the exact measurements of your wardrobe. Customers need to see at a glance whether the furniture fits their space.
7. No Watermarks or Logos in the Image
Remove all watermarks, company logos, or distracting overlays from your product images. Home24 requires clean images, and visible watermarks look unprofessional and distract from the product.
These Mistakes Cost You Conversion on Home24
Some mistakes look harmless but cost real money. Here are the most common pitfalls in wardrobe listings.
Too Few Images per Listing
A single image isn’t enough. Customers want to see the product from all sides, view the doors open, and recognize details. Listings with only one or two images appear incomplete and raise suspicion.
Missing Lifestyle Contextualization
Only cutouts look sterile and interchangeable. Without a living context, the emotional connection that drives purchase decisions is missing. A wardrobe in a furnished bedroom sells better than the same wardrobe against a white background.
Unclear Size Proportions
Without dimension markings or reference objects, customers can’t gauge the size. This leads to returns — expensive for you and frustrating for the customer. A simple dimension drawing prevents this problem.
Scaling Wardrobe Image Production with AI
Traditional photo shoots have their place, but for daily product communication, they’re often too slow and too expensive. AI tools like showcase significantly accelerate image production.
| Aspect | Traditional Shoot | AI Image Generation |
|---|---|---|
| Lead time | 2-6 weeks | Seconds to minutes |
| Cost per scene | 250-500 € | 0.50-5 € |
| Color variants | New shoot required | Automatically generated |
| Scaling | Linear with costs | Nearly constant |
The workflow is simple: upload cutout, define scene, generate image. For wardrobe sets, multi-product staging offers the option to combine multiple furniture pieces in one scene — ideal for cross-selling.
Get started for free, no credit card required.
FAQ About Wardrobe Product Images on Home24
How many images should I upload per wardrobe on Home24?
Upload 5-8 images so customers can see the wardrobe from all sides and with open doors. A mix of cutouts, lifestyle images, detail shots, and dimension drawings covers all information needs.
What resolution does Home24 require for product images?
Home24 recommends high-resolution images starting at 1000 x 1000 pixels so the zoom function works and details remain visible. Check the current seller guidelines for exact specifications.
Can I use AI-generated images on Home24?
Yes, as long as the images represent the product accurately and realistically. AI-generated lifestyle and ambiance images are a common practice in eCommerce.
How do I create lifestyle images for wardrobes without an expensive photo shoot?
With AI image studios like showcase, you upload a cutout and generate photorealistic living scenes in seconds — without a studio, photographer, or props. Getting started is free.
Do I have to photograph each color variant of my wardrobe individually?
No, with AI-powered tools you can create color variants digitally from a single product image. This saves multiple shoots and enables quick assortment expansions.
Get started for free, no credit card required: showcase.ai
About the author

Author
Tim Hoffmann
Chief Product Officer, getshowcase.ai
Tim Hoffmann leads the product strategy for the AI image studio at showcase (getshowcase.ai). He brings years of e-commerce experience in product data, marketplace integrations, and visual content creation. His focus: helping Home & Living retailers turn product cutouts into photorealistic lifestyle images and room scenes in minutes – without expensive shoots, with measurably better conversion. Tim shares practical strategies for product images that perform on marketplaces and in your own shop.