How to Create Lifestyle Images Without a Photoshoot: 2026 Guide
How to Create Lifestyle Images Without a Photoshoot: 2026 Guide
TL;DR
Lifestyle images without a photoshoot are created from existing product photos, cutouts, or CAD data. AI, CGI, or compositing generates the scene while the product itself remains unchanged. The safest workflow: prepare a product-accurate source image, define the scene via prompt or template, generate, check for product integrity, and export to the right format for each channel. Skipping the shoot does not mean skipping care, because shape, color, material, and scale must all be correct.
What Does “Lifestyle Images Without a Photoshoot” Mean?
Anyone asking “how to create lifestyle images without a photoshoot” wants product images in realistic settings (living room, kitchen, office, terrace) without a physical set, photographer, location, or props.
In the DACH market the term Milieubild (room scene) is common, especially for furniture, lighting, rugs, and home decor. Internationally the equivalent terms are “lifestyle product images” or “room scenes.”
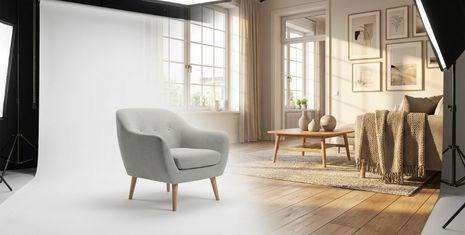
The difference from a packshot: a packshot shows the product in isolation, usually on a white background. A lifestyle image shows it in context, next to a sofa, on a dining table, in a children’s room. These contexts answer buyer questions that a cutout alone cannot resolve. For a deeper dive, the guide to photorealistic lifestyle images provides a detailed walkthrough.
Why Are Lifestyle Images So Important in E-Commerce?
Lifestyle images are not decoration. They are purchase decision aids.
Baymard Institute research shows that 56% of users explore the images as their first action on a product detail page. Even more relevant for furniture and Home Living: 42% of buyers try to gauge product size from images.
A sofa on a white background looks like every other sofa. Only in a living room, next to a coffee table and a floor lamp, does it become clear: does it fit my space? Does the style match my home?
In concrete terms, lifestyle images answer these questions:
- How large is the product in the room?
- How does the material look in a real environment?
- Which products go with it?
- Does the style fit my home?
Without such images, context is missing and customers hesitate or buy elsewhere. That is why more and more retailers are looking for ways to create lifestyle product images without a photoshoot.
showcase lets you get started from existing cutouts, no shoot required and no waiting time.
Glossary: Key Terms in the Workflow
Before you start, it helps to know the core terminology. This glossary follows the order of a typical workflow, from source image to publication.
Cutout (Freisteller)
A product with no background, isolated on a transparent or white ground. A clean cutout is the single most important prerequisite for placing product images without a shoot into new scenes. For textiles, glass, and delicate furniture legs, edges need special attention. More detail in the guide to AI background removal.
Packshot
A clear, neutral product shot. Usually the main image on shop and marketplace pages. The packshot delivers product truth; lifestyle images add context.
Room Scene (Milieubild)
The DACH term for a product image in a living or room setting. Particularly relevant for furniture, rugs, lighting, and decorative items. Internationally known as “room scene” or “lifestyle shot.”
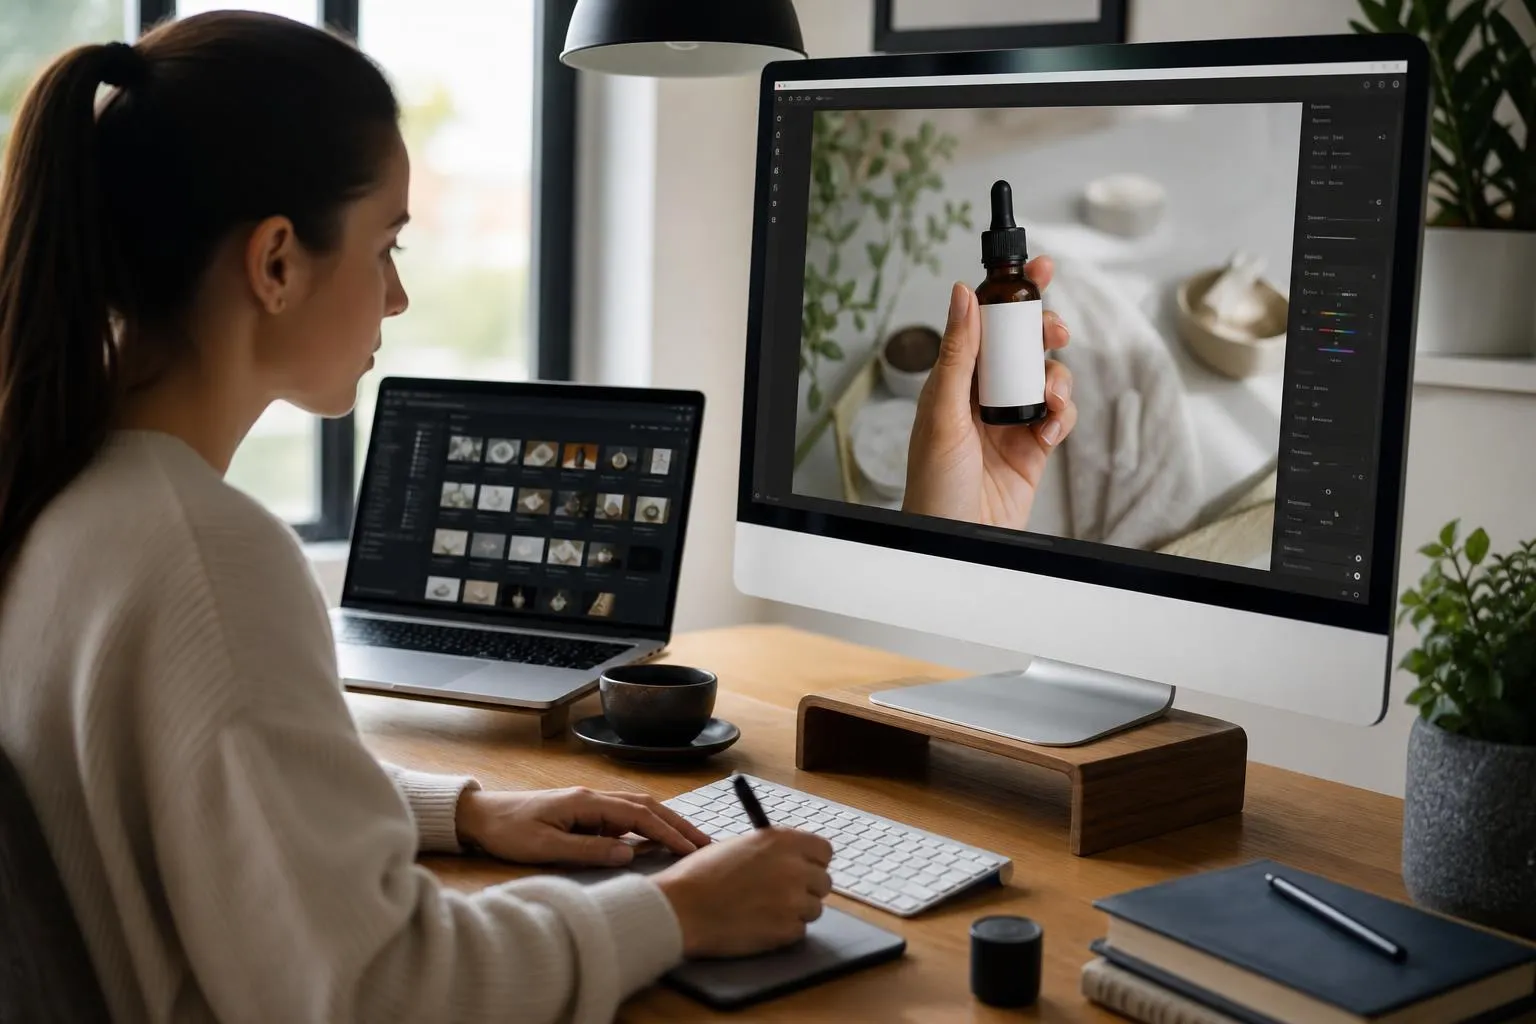
AI Product Photography
The use of generative AI to create, extend, or place product images into scenes. The typical flow: upload the product, define the scene via prompt, review the result. Specialized tools generate the environment, lighting, and shadows while keeping the product intact.
CGI / 3D Rendering
An image produced from a digital 3D model rather than a camera shot. Especially useful for configurable furniture because the 3D asset can be reused, re-lit, and reconfigured indefinitely.
Prompt
A text instruction to an AI model describing the scene, lighting, style, camera angle, and mood. “Living room” is too vague. “Scandinavian living room with light oak floors and soft daylight from the left” produces far better results. Detailed prompt tips for furniture images are available in the blog.
Negative Prompt
An exclusion list for unwanted elements: no distorted proportions, no wrong colors, no watermarks. Reduces typical AI artifacts.
Contact Shadow
The shadow directly beneath the product where it touches the floor. Without a contact shadow, a piece of furniture appears to float in midair. One of the most common mistakes in AI-generated room scenes.
In-Scale Image
An image with a scale reference. The sofa sits next to a coffee table and lamp; the rug lies under the dining table. Helps buyers gauge real-world size.
Product Integrity
The product remains accurately represented in shape, color, material, text, logo, and proportion. The most important rule when creating lifestyle images without a shoot. A beautiful image that alters your product is not a good product image.
Multi-Product Staging
Multiple products placed together in a shared room scene. Useful for cross-selling, room concepts, and sets. More on this in the multi-product staging guide.
Batch Processing
Automated creation or editing of many product images at once. Critical for catalogs with hundreds of SKUs, colors, and material variants. Shopify community users report that the lack of direct integration between AI tools and their store makes processing large image volumes harder. Anyone looking to scale needs workflows with a direct connection.
IPTC DigitalSourceType
A metadata field for labeling AI-generated images. Google Merchant Center requires this field for generative AI images.
The 4 Methods: Creating Lifestyle Images Without a Photoshoot
Different methods suit different source materials, product categories, and intended uses. Most articles online explain only one of them. Here are all four compared.
Method 1: AI from a Cutout or Product Photo
You upload a cutout, define a scene via prompt, and the AI generates the environment, lighting, and shadows. The product remains as a real-world reference throughout.
Best for: Quick room scenes, seasonal variants, social media ads, PDP gallery images, large SKU counts.
Practitioners on Reddit report that specialized product photo tools perform better here than general image generators because they do not reinvent the product, they only swap the environment.
If you also want to generate color variants virtually alongside room scenes, that can be done in the same workflow.
Method 2: CGI/3D from CAD or a 3D Model
When CAD data or technical drawings are available, these can be turned into photorealistic images with full control over dimensions, perspective, and materials. 3D assets serve as reusable master assets that can be re-lit and placed in new rooms repeatedly.
Best for: Configurable furniture, 360-degree views, pre-launch visualization, long-lived catalog products.
Anyone weighing AI against CGI will find a solid orientation in the AI vs. CGI guide.
Method 3: Hybrid Compositing
A real product photo remains the product layer. AI or CGI generates the surrounding environment. This approach delivers the highest product fidelity because color, material, and geometry come directly from the original photo.
Best for: Products with critical surfaces (leather, wood grain, fabric texture), products with logos or text, main images on product detail pages.
Reddit ecommerce threads consistently recommend this approach: the product photo stays real, AI handles only the background and room context. Colors and proportions stay correct.
Method 4: Real Shoot Plus AI Extension
A product shoot provides the reference material. From a small number of studio shots, many lifestyle variants, seasonal adaptations, and format adjustments are then generated with AI.
Best for: Hero campaigns, print material, brand images, products with complex tactile qualities.
Real shoots are not obsolete. They become the starting point from which AI scales additional assets.
Decision Guide: Which Method Fits?
| Situation | Recommended Method | Why |
|---|---|---|
| Only cutouts available | AI from cutout | Fastest route to room scenes |
| CAD or technical drawings | CGI/3D or CAD-to-image | Exact dimensions and configurations |
| 200+ SKUs across multiple room styles | AI + batch workflow | Scales better than individual shoots |
| Exact fabric or wood accuracy required | Hybrid (real photo + AI environment) | Minimizes color deviation |
| Amazon main image | Product-accurate packshot | Strict marketplace rules |
| Social media ads | AI lifestyle variants | Fast creative testing |
| Premium magazine visual | Real shoot or high-end CGI | Maximum art direction |
An overview of AI tools for product photography is available at /en/compare/.
Step by Step: How to Create Lifestyle Images Without a Photoshoot
Step 1: Define the Image Purpose
Purpose first, then prompt. Every lifestyle image should answer exactly one buyer question:
- Show size in the room
- Show how the material looks
- Show the product in use
- Show a cross-sell combination
- Show a color variant
- Create a seasonal mood
A practitioner in a Reddit ecommerce marketing thread puts it well: four practical listing images that address buyer objections often outperform a single cinematic hero image. Not every image needs to be a campaign.
Step 2: Prepare the Source Image
The quality of the output depends on the source image. Ideal input:
- Sharp, high-resolution product photo
- Neutral lighting without harsh cast shadows
- Clean edges and true colors
- Multiple angles, if available
For Shopify stores: square product images at 2048 x 2048 px typically display best. The maximum is 5000 x 5000 px at under 20 MB.
Step 3: Remove the Background
A clean cutout separates the product from its original background and prepares it for new scenes. For furniture, pay particular attention to:
- Chair and table legs fully isolated
- Rug fringe and soft edges cleanly cut
- Lamp cables not accidentally cropped
- Transparent glass and reflective metal handled correctly
- Shadows under furniture not inadvertently included
Step 4: Define the Scene
This is where a room scene goes from generic to convincing.
Weak: “Living room background”
Strong: “Modern Scandinavian living room, light oak floor, cream-colored wall, indirect daylight from the left, subtle neutral decor, camera at seat height, natural contact shadow, product centered”
Atlas Cloud describes the same experience: specific scene descriptions with floor type, lighting, and materials produce far more believable placements than generic background descriptions.
Step 5: Generate and Iterate
Generate multiple variants. The first result is rarely the best. Vary the light direction, camera angle, room style, and decor. Use seeds or style presets to keep results consistent across many SKUs.
A LinkedIn practitioner who tested AI fashion photography at scale warns: when lighting, environment, and color temperature drift across hundreds of images, approvals become a bottleneck. Consistency matters just as much as individual image quality when working with large catalogs.
Step 6: Check Product Integrity
The most critical step. A lifestyle image may create emotion, but it must not deceive.
Check systematically:
- Shape unchanged?
- Color correct?
- Material texture realistic?
- Logo, text, label undistorted?
- Proportions in the room plausible?
- No hallucinated or missing parts?
- No variant shown that does not exist?
The core rule: AI scales variants, humans approve. That is the practical standard practitioners on LinkedIn emphasize repeatedly. When every brand can generate unlimited lifestyle images, the differentiator is no longer the most spectacular image but accurate product representation and recognizability.
Step 7: Export and Publish
Different channels have different requirements:
- Shopify: Square, 2048 x 2048 px recommended, maximum 20 MB
- Amazon (main image): Pure white background, product fills at least 85% of the image area
- OTTO: Product between 85 and 95% of the image area
- Social/Ads: Format adaptation (1:1, 4:5, 9:16), channel-appropriate cropping
- Google Merchant Center: Set IPTC metadata for AI-generated images
Further Reading
- Photorealistic Lifestyle Images with AI
- AI vs. CGI for Product Images: Guide 2026
- Multi-Product Staging and Cross-Selling
showcase is an AI platform for Home & Living product photography. From simple cutouts, photorealistic room scenes, color variants, and lifestyle images are created in seconds, no photoshoot, no waiting time. Start for free today
About the author

Author
Tim Hoffmann
Chief Product Officer, getshowcase.ai
Tim Hoffmann leads the product strategy for the AI image studio at showcase (getshowcase.ai). He brings years of e-commerce experience in product data, marketplace integrations, and visual content creation. His focus: helping Home & Living retailers turn product cutouts into photorealistic lifestyle images and room scenes in minutes - without expensive shoots, with measurably better conversion. Tim shares practical strategies for product images that perform on marketplaces and in your own shop.